Wednesday, September 2, 2009

Blueberry Molasses Cake

It's been a while since I've poached a recipe from 101 Cookbooks, the superstar natural foods blog. If you like thoughtful, health-conscious, whole foods, you will love what's going on there. Read up.

Recently ran across a recipe there for Old-Fashioned Blueberry Cake, itself lifted from a vintage issue of Gourmet, circa 1974 I believe? I loved that the cake contains no sugar, only molasses as a sweetener, as well as a healthy dose of frozen blueberries. The natural sweetness of this cake is so satisfying and so simple. It's a great bite at the end of a meal or alongside afternoon tea. The molasses gives it a gingerbready flavor, so be prepared to taste a little autumn. Granny here is looking out for ya.


Blueberry Molasses Cake
c/o 101 Cookbooks, c/o Gourmet; takes about 45 minutes total

1/2 cup flour
1/2 tsp baking soda
1/4 tsp baking powder
pinch salt
1/4 tsp cider vinegar
2 1/2 Tbsp milk, divided
1/4 cup unsulphered molasses
1 egg
1 1/2 Tbsp butter, barely melted
2/3 cup frozen blueberries, tossed in a dash of flour

  1. Preheat oven to 350º. Grease a 5-inch round cake pan, or equivalent. Mix together flour, soda, powder and salt in a large bowl. Set aside.
  2. In a small bowl, mix cider vinegar + 1 Tbsp milk. In another bowl, whisk together remaining 1 1/2 Tbsp milk and molasses. Add vinegar-milk to molasses-milk and mix well. Add egg. Pour wet over dry and stir to combine. Stir in butter, then blueberries. Pour into prepared pan.
  3. Bake for 20-25 minutes, or until toothpick inserted in center comes out clean. Top with powdered sugar or enjoy as is.

Tuesday, September 1, 2009

M. Y. O. F. Y. - or - Tell Pinkberry to Shove It

I think it was about halfway through the summer when it hit me: frozen yogurt is just frozen yogurt. Could I replicate the cold, creamy goodness of peddlers nationwide in my own freezer?

The short answer is yes. Buy a big carton of yogurt for $3 instead of a single serving at the dairy bar for the same amount. Churn it in your ice cream maker (or stash it in the freezer, stirring thoroughly every 30 minutes) until you reach the consistency you like. Get creative. I bought nonfat lemon yogurt and tossed in some macerated blueberries. I happen to really love the taste of plain yogurt with honey swirled in.

Like most homemade ice creams, however, this concoction gets hard after a few days. Microwave to the rescue, though; just pop it in for 20-30 seconds, stir, and spoon.

Monday, August 31, 2009

Out of the Kitchen, Onto the Couch

Read this, all the way to the end. Then maybe tell me what you think?

Peanut Butter Cheesecake Brownies

Because Bon Appetit wishes to taunt me with its glossy pages and its delicious recipes and its close-ups of towering slices of cake--with glistening frosting and nothing but a lonely fork beside them, just begging begging to be picked up--I immediately fainted when I received the January issue this year. A whole spread on Peanut Butter Desserts, the cover advertised? I still haven't read the rest of the issue. Mostly I've just focused on pages 64-71.

What I love about the desserts in this particular article is that they all use natural peanut butter, not the processed peanut-flavored product endowed with shelf-immortality. Don't get me wrong, Skippy has its place. But if you're a peanut butter nut (yeah, it's a pun, get over it) like me, as close to the peanut is where it's at.

So yester-evening, as the temperatures started to sag in Boston, I fired up the oven and baked a downsized batch of their Peanut Butter and Chocolate Swirl Cheesecake Brownies. I know, you just fainted too, right? Because I wasn't sure how big of a pan to use, I just meted out the ingredients into a cupcake tin and it worked perfectly. Unfortunately, I don't like brownie end pieces (I'm a gooey-from-the-middle kind of gal), which is basically what you get from the tin. If you hate this, use a muffin cup liner or simply do what I did and eat out the middle!

Peanut Butter and Chocolate Swirl Cheesecake Brownies
makes 4; total time about 40 minutes, but I think they taste best cold, so if you can have patience, stash them in the fridge for an hour before eating

For the brownie layer:
2 oz semisweet chocolate, chopped
2 Tbsp butter
2 Tbsp sugar
1/2 egg, lightly beaten *(beat full egg and save other half for the topping)
1/4 tsp vanilla
2 Tbsp flour
pinch salt

For the cheesecake layer:
2 oz cream cheese, soft
1 heaping Tbsp natural peanut butter
1/4 tsp vanilla
2 Tbsp sugar
1/2 egg
1/2 Tbsp cream or half-and-half
1/2 Tbsp flour
1/2 oz semisweet chocolate, chopped
  1. Preheat oven to 325º and spray 4 muffin cups with nonstick spray.
  2. First, the brownie layer: melt the chocolate and butter together in a small saucepan or in a microwave (slowly--only 20 or so seconds at a time!). Set aside. Meanwhile, beat sugar, 1/2 egg and vanilla with electric beaters--or your indefatigable arm strength--until fluffy, 2-3 minutes. Gradually add chocolate mixture then stir in flour and salt. Divide among 4 cupcake cups.
  3. Next, the cheesecake: Beat cream cheese, peanut butter and vanilla together until smooth. Add sugar gradually, beating until fluffy. Add remaining 1/2 of beaten egg and mix well, then cream, then flour.
  4. In a small bowl, place chopped chocolate and microwave at 15 second intervals until melty. Stir smooth. (You want to be extra special careful because chocolate on its own, i.e. no butter, oil, etc., will burn very easily. Go slow and check often.) When nice and melted, stir in 1 Tbsp of cream cheese mixture and mix well. Divide remaining cream cheese mixture between 4 cups and spread over top, then ladle chocolate-cream cheese mixture into the center of each. Using a toothpick, swirl chocolate and plain cream cheese mixtures together.
  5. Bake 15 minutes, then start checking. You want the edges to be slightly puffed and the center is set. I overbaked. Don't make the same mistake.
  6. Let cool slightly, then extract from tin. Chill in the freezer or fridge until ready to eat.


"Asian" Chicken Salad

There's this rumor going around that some people are actually reading this blog and actually noticing when I go, say, three weeks without posting anything. Admittedly, it's partly out of mere exhaustion, but partly because I have heretofore been 90% sure that my mother is the only one reading. I really do take pictures of almost everything I eat in anticipation of posting some day. What I have in optimistic creativity I lack in follow through.

So, let's try this again. Here is last night's dinner. Not life changing, but since this type of dish is popping up on chain-restaurant menus across the country (including a certain Jack-in-the-Box in a certain rural Texas town I recently visited), someone must be eating it. We have elsewhere discussed my preoccupation with salads, and as I love these flavors, I much prefer to toss them together myself. With the exception of snow peas (and the dressing), 100% of the components of this salad can be found at farmers markets right now. So buy there if you can. The "Asian" is in quotes because I'm pretty sure no one in Asia eats anything similar to this....

"Asian" Chicken Salad
serves 2; total time 20 minutes, less if you have precooked chicken

4-5 leaves napa cabbage
4-5 leaves romaine lettuce
1 small carrot, thinly sliced
4 radishes, halved and thinly sliced
1 inch thinly sliced cucumber
8-10 snow peas, julienned
2-3 scallions (green onions), chopped
2ish Tbsp chopped cilantro
2ish Tbsp chopped mint
small handful of peanuts, chopped
1 breast grilled chicken

for the dressing:
2 Tbsp rice wine vinegar
1 Tbsp soy sauce
1 good blop of honey from the honey bear
1 tsp fresh grated ginger (or sprinkle of dried will do)
1-2 Tbsp toasted sesame oil**
(optional, 1 Tbsp creamy peanut butter and a squirt of hot sauce or sprinkle of red pepper flakes, for some kick)

  1. If your chicken breast is not already cooked (ala the Whole Foods prepared foods counter or rotisserie chicken aisle) grill it on your George Foreman, broil it in the oven, poach it in some water--whatever you like. Just get it cooked and slice it up.
  2. Divide salad ingredients into two bowls: do this as you chop them to save time and space. Whisk dressing ingredients together vigorously and pour over salads. Top with chopped herbs and nuts.
  3. Tada!
**Special note: sesame oil and toasted sesame oil are two very different things. Be sure you get toasted sesame oil for the best flavor.

Tuesday, August 18, 2009

Marinated Eggplant and Goat Cheese Toasts


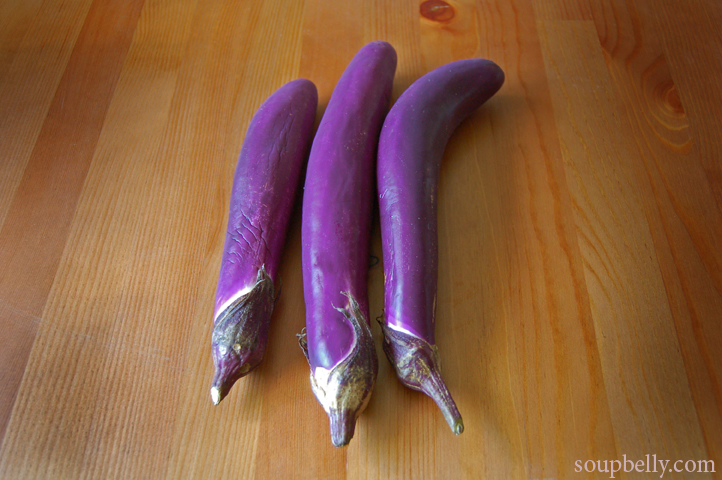
Found some Asian eggplant at the farmer's market yesterday and remembered, somewhere deep in my mental files, a recipe from Gourmets-long-past that we had liked last summer. First, you disk up the long, thin specimens, broil them briefly, and marinate them for at least 30 minutes or up to a couple of days. Room temperature is their ideal state, so even if that room's temperature is in the 80s--as mine relentlessly is these days--at least you don't have to fire up the oven any longer than 10 minutes on this one.

I think it's designed as an appetizer, but add a thick piece of toast schmeared with goat cheese, and call it lunch (or dinner, like we did last night).

Marinated Eggplant and Goat Cheese Toasts
(serves 1-2; active time, about 15 minutes + 30 min marinating, but can be done well in advance)

1 lb. asian eggplants, sliced into thin rounds
olive oil
2 Tbsp. red wine vinegar
2 Tbsp capers
1/4 cup chopped mint
bread
goat cheese
  1. Place eggplant slices in a single layer on sheet pan and brush with olive oil (or spray with cooking spray), then sprinkle with salt. Broil 5 minutes, then flip, repeat, and broil 5 minutes more.
  2. In a bowl, combine vinegar, 2 Tbsp olive oil, capers, and mint. Toss cooked eggplant in mixture and allow to marinate at least half an hour.
  3. Spread cheese on your toast and use as a scoop or a plate.

Saturday, August 15, 2009

Ice Cream Cupcakes

Ok, this recipe is so cute it almost makes me want to ralph. Except for the fact that it is so friggin perfect for a summer evening, I would have completely denied that I ever made it. Lucky for you, it is perfectly one-, two-, or twenty-person sized, so it made the blog cut! Bonus: super easy.

Ice Cream Cupcakes
(serves as many or as few as you want, depending on how much of the ingredients you buy; takes at least 2 hours)

1 slice pound cake, about 1 inch thick
2 scoops ice cream
freshly whipped cream
  • Take two cupcake liners (foil works best, but doubled-up paper will probably work too) and cut two circles of pound cake to fit in the bottom. Top with a scoop of ice cream and set in freezer to harden, at least 1 hour.

  • Whip your cream or break out the cool whip and "ice" the "cupcakes" with whipped cream. Return to the freezer to fully freeze, another hour.
Notes: I used lemon pound cake and blueberry ice cream, but work with any combination of flavors you like. Truly, this little concoction would make an adorable dinner party denouement: perfect single-size, able to be prepared well ahead of time. If you just want one or two, try buying a single slice of pound cake from your local bakery.